Ever found yourself wishing you could bypass those frequent trips to the tire shop, whether to save on those mounting bills or prep for the next track day? Imagine the satisfaction and convenience of mastering the art of tire balancing right in your own garage, tailoring it to your specific needs.
How To Balance Tires Yourself
Balancing tires yourself at home involves ensuring that the tire’s weight is uniformly distributed around its axis to maintain a smooth ride. This process can be achieved using an inexpensive tire balancer, some basic tools, and careful attention to safety precautions.
In this article, we’ll delve deep into understanding tire imbalances, the methods to mount and balance tires, signs of an unbalanced tire, and DIY approaches, all while emphasizing essential safety measures to ensure a hassle-free experience.
Let’s take a closer look.
No products found.Bubble Balancer
Using a Bubble Balancer for Tires
In the quest for the perfect tire balance, various tools and techniques come into play. Among these, the bubble balancer stands out as both traditional and reliable. Let’s delve into its use and advantages.
What is a Bubble Balancer?
A bubble balancer, sometimes known as a static balancer, uses a simple yet effective principle to measure tire imbalance.
Principle Behind It
- It features a spindle to hold the wheel and tire assembly.
- A liquid-filled gauge with an air bubble is mounted on the base.
- When the tire is perfectly balanced, the bubble centers itself in the gauge.
Step-by-Step Guide to Using a Bubble Balancer
- Setup:
- Ensure the balancer is on a level surface. This is crucial for accurate readings.
- Mount the Tire:
- Place the wheel and tire assembly on the spindle of the balancer.
- Read the Bubble:
- Observe the position of the bubble in the gauge.
- If it’s centered, the tire is balanced.
- If not, the bubble’s direction indicates which side of the tire is heavier.
- Add Weights:
- Based on the bubble’s position, add wheel weights to the lighter side of the tire.
- Recheck the bubble after each weight addition.
- Continue this process until the bubble centers itself.
Benefits of Using a Bubble Balancer
- Simplicity: It’s straightforward and doesn’t require electricity or complex calibration.
- Cost-effective: Typically less expensive than electronic balancers.
- Portable: Its lightweight design makes it easy to transport and use in various locations.
Potential Limitations
- Accuracy: While suitable for most passenger cars, it might not be as precise as electronic balancers for performance vehicles or larger tires.
- Single Plane: It only checks static (vertical) balance and doesn’t account for dynamic imbalances.
Ideal Scenarios for Bubble Balancer Usage
- DIY Enthusiasts: For those who want to balance their tires at home without the need for electronic equipment.
- On-the-Go Balancing: Its portability makes it ideal for on-site balancing, like at car shows or racetracks.
- Vintage Car Owners: For vehicles where only static balance is crucial.

How to Use Bubble Balancers
Bubble balancers, or static balancers, are straightforward tools that help in achieving a basic balance for your tires. They utilize a bubble in a liquid-filled gauge to indicate balance. While they might not offer the precision of modern electronic balancers, bubble balancers can provide adequate balance for many applications, especially for occasional or DIY mechanics. Here’s a step-by-step guide on using one:
1. Set Up the Bubble Balancer
- Level Ground: Ensure that you place the bubble balancer on a level surface. It’s essential for accurate readings.
- Stabilize the Balancer: Some models might have adjustable legs or a base. Ensure they are secure, and the unit is stable.
2. Prepare the Wheel and Tire Assembly
- Ensure the tire is fully inflated to the recommended pressure.
- Clean any debris, dirt, or residual weights from the wheel.
3. Mounting the Wheel on the Balancer
- Most bubble balancers come with a central cone or spindle. Mount the wheel onto this cone. Ensure it sits flush, without any wobble or tilt.
- Release any locking mechanism the balancer might have to let the bubble move freely.
4. Read the Bubble Position
- Once the wheel is mounted, the bubble in the gauge will move.
- If the bubble is centered in the gauge’s circle, the tire is balanced.
- If the bubble is off-center, it indicates the side of the wheel that requires weight.
5. Adding Weights to the Wheel
- Start by adding wheel weights to the side opposite the bubble’s direction. This will help bring the bubble to the center.
- Stick-on or clip-on weights can be used, depending on your wheel type.
- Continue adding weights incrementally. After placing each weight, check the bubble’s position.
6. Finalizing the Balance
- Once the bubble is centered, the tire is balanced for static discrepancies.
- Lock the balancer if it has a lock mechanism and carefully remove the wheel.
Tips and Reminders:
- Precision: Remember that bubble balancers balance the tire in a static position, which might not account for dynamic imbalances that occur when the tire is in motion. For high-speed applications or if you notice issues, a dynamic balance at a professional shop might be necessary.
- Consistent Pressure: Tire pressure can affect balance. Always ensure tires are properly inflated before balancing.
- Clean Mount: Ensure the wheel mounts cleanly onto the balancer without debris or obstructions that could affect the reading.
Balancing Beads
Tire Balancing Beads
Driving comfort and tire longevity hinge on balanced tires. A newer, innovative method that has gained traction in the automotive world is the use of tire balancing beads. Here’s what you need to know about them.
What are Tire Balancing Beads?
Tire balancing beads are small, round beads made from ceramic or other heavy materials. These beads, when placed inside a tire, automatically distribute themselves to counteract imbalances.
How do they work?
- As the tire rotates, centrifugal force pushes the beads to the areas where weight is needed.
- They continuously reposition themselves, adapting to changes in the tire’s balance.
Benefits of Using Tire Balancing Beads
Tire balancing beads offer several advantages over traditional methods:
- Self-adjusting: They automatically reposition to balance the tire, even as the tire wears down over time.
- No external weights: Eliminates the need for stick-on or clip-on wheel weights.
- Versatile: Suitable for various vehicle types, including trucks, motorcycles, and RVs.
- Durability: Less prone to fall off or lose their balancing ability over time, unlike traditional weights.
Potential Drawbacks
However, there are some considerations:
- Not Ideal for All Tires: Some manufacturers might not recommend them for certain types of tires or vehicles.
- Installation: They need to be inserted during tire mounting, which might be a challenge for DIY enthusiasts.
- Noise: In some cases, drivers might hear the beads moving, especially at lower speeds.
How to Use Them
- Select the Right Quantity: It’s essential to use the recommended amount of beads for your tire size.
- Insertion: The beads can be poured in during the tire mounting process.
- Drive: Once inserted, simply drive! The beads will distribute themselves appropriately as the tire rotates.
When to Consider Tire Balancing Beads?
- Frequent Drivers: Especially those who drive on varied terrains and require constant tire balance adjustments.
- Off-Road Vehicles: They are particularly beneficial for off-road vehicles which face continuous terrain changes.
- Larger Vehicles: Trucks and RVs, which might need frequent rebalancing, can benefit significantly.

How To Use Balancing Beads
Balancing beads are an innovative solution to maintaining tire balance. These small beads, often made of ceramic or other dense materials, move within the tire to counteract imbalances as the tire rotates. They’re especially popular for large vehicle tires, off-road applications, and other situations where traditional balancing methods might be less effective. Here’s how to use them:
1. Select the Right Quantity
- Refer to Manufacturer’s Chart: Most bead manufacturers will provide a chart or guide indicating the correct amount of beads for different tire sizes. Ensure you’re using the right quantity for your specific tire.
2. Prepare the Tire
- Deflate Completely: Before adding the beads, ensure the tire is fully deflated.
- Inspect the Tire: Ensure the inside of the tire is clean and free from moisture. Balancing beads work best in dry conditions.
3. Adding the Beads
There are several methods to introduce the beads into the tire:
- Through the Valve Stem: With the core removed, pour the beads through the valve stem using a funnel or an applicator bottle. Replace the core once done.
- Pre-Packaged Beads: Some manufacturers offer beads in biodegradable packets. These can be placed inside the tire during mounting, and they’ll break down, releasing the beads once the tire is in use.
4. Inflate the Tire
- Once the beads are inside, inflate the tire to its recommended pressure.
5. Rotate the Tire
- For the beads to distribute themselves correctly, drive or rotate the tire. As the tire rotates, the beads will move to the areas where balance is needed, effectively offsetting any imbalances.
Tips and Reminders:
- Avoid Mixing: If the tire was previously balanced using traditional weights, remove them before using balancing beads.
- Regularly Check Tire Pressure: Proper tire inflation ensures that the beads can move freely and do their job effectively.
- Not for All Tires: While balancing beads can be a great solution for many tires, especially larger ones or those on vehicles that drive on uneven terrains, they might not be suitable for high-performance sports cars or other specialized applications.
- Valve Maintenance: Regularly check and clean the valve stem. Sometimes, a few beads might get caught, potentially leading to slow leaks.

How to Remove a Tire from a Rim Without a Machine
Removing a tire from a rim, also known as “breaking the bead,” can be a challenging task without the aid of professional equipment. However, with a bit of elbow grease, patience, and the right technique, it’s possible to do it yourself. Here’s a step-by-step guide on how to achieve this:
1. Safety First
Before you start, always prioritize safety.
- Wear safety gloves and protective eyewear.
- Make sure you’re working in a well-ventilated, spacious area.
- Ensure the vehicle or tire is securely stabilized.
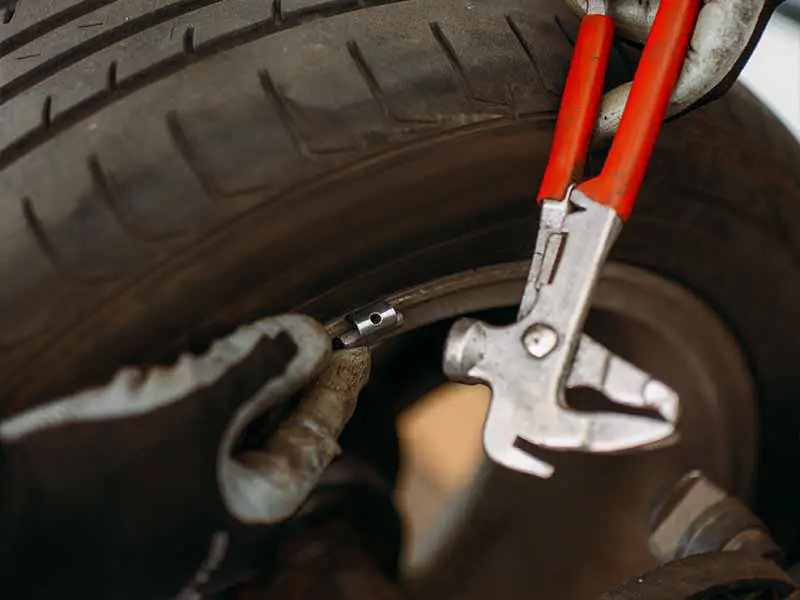
2. Deflate the Tire Completely
- Remove the valve cap from the tire.
- Using a valve core tool, unscrew and remove the valve core to let out all the air.
- Ensure the tire is fully deflated before proceeding.
3. Breaking the Bead
This is the most physically demanding step, so ensure you have enough room to work and leverage:
Breaking the Bead with a Pry Bar
- Position the Tire: Lay the tire flat on the ground with the outer side facing up.
- Apply Downward Pressure: Using a sturdy 4×4 wooden plank or a long metal bar, place one end on the tire’s outer edge where it meets the rim. To apply pressure, carefully drive your vehicle (or another heavy object) onto the other end of the plank or bar. This should push the tire bead down and away from the rim.
- Work Your Way Around: Reposition the plank or bar every few inches around the rim and repeat the process. This ensures the entire bead breaks free from the rim edge.
Breaking the Bead with a Tire Jack
Utilizing the tire jack found in most vehicles is a clever way to leverage the weight and mechanics of your car or truck to break the bead:
- Position the Tire: Lay the tire flat on the ground with the outer side facing up.
- Setting Up the Jack: Position your vehicle so that there’s space underneath, near the tire, to place the jack. Position the jack between the tire and the undercarriage of your vehicle, ensuring the lifting end of the jack is pressing up on the vehicle’s jacking point and the jack foot is pressing down on the tire’s outer edge where it meets the rim. You may want to use a wooden block to help ensure the pressure is distributed wider across the tire and protect it.
- Applying Pressure: Slowly start to operate the jack, so it compresses the tire downwards. The pressure will push the tire bead down and away from the rim. Ensure the jack is stable at all times and that you are standing clear of the vehicle’s path.
- Work Your Way Around: After the bead breaks away from one section, deflate the jack, reposition the tire, and repeat the process on another section. Continue doing this around the circumference of the tire until the entire bead is free from the rim.
4. Prying the Tire Off the Rim
- Leverage with Tire Irons: Using tire irons or large flat-head screwdrivers, insert one tool between the tire and rim, prying the tire up and over the rim. Once you have a section of the tire over the rim, insert a second tire iron a few inches away and repeat the process.
- Work in Sections: Continue prying and moving around the tire until one side is entirely off the rim. Flip the tire and repeat for the other side.
Tips and Reminders
- Lubricate: Using soapy water can make the process smoother, helping the tire slide over the rim edge more easily.
- Patience is Key: The process can be tedious, especially the first time. Take breaks if necessary and avoid using excessive force, which might damage the tire or rim.
Remember, while removing a tire without a machine is feasible, it’s physically demanding and may not be suitable for everyone. Always prioritize safety, and if in doubt, consider seeking professional assistance.
No products found.Manual Tire Changer
How to Mount a Tire Without a Machine
Mounting a tire without the aid of specialized equipment might seem daunting, but with patience and the right techniques, it’s achievable. Here’s a step-by-step breakdown:
1. Safety Above All
Safety is paramount, so before you proceed:
- Wear safety gloves and protective eyewear.
- Ensure you’re working in a well-ventilated area.
- Ensure the tire and rim are stable and not rolling or moving.
2. Prepare the Rim and Tire
- Clean the Rim: Before mounting, ensure the rim is free of dirt, rust, and old tire remnants. A wire brush can help clean stubborn areas.
- Tire Direction: Some tires have a directional tread pattern. Ensure you’re mounting the tire in the correct orientation, which is usually indicated by arrows on the tire sidewall.
3. Lubricate the Beads
- Using soapy water or a specialized tire lubricant, wet the edges (or beads) of the tire. This eases the tire’s slip onto the rim and makes the process smoother.
4. Mounting the First Bead
- Position the Tire: Begin by pushing one edge (or bead) of the tire onto the rim. Using your hands, try to get as much of this bead over the rim as possible.
- Leverage with Tire Irons: Once you’ve reached a point where you can’t push the bead over with just your hands, use tire irons or large screwdrivers to assist. Insert one tool to hold the tire in place, then use a second tool to pry more of the tire onto the rim. Be patient, working little by little around the rim.
5. Mounting the Second Bead
- Repeat the process for the tire’s other edge or bead. This might be slightly more challenging since the tire is partially on the rim already. Using tire irons and the lubrication will be crucial here.
6. Inflate the Tire
- Once both beads are on the rim, inflate the tire. Listen and watch for both beads to “seat” onto the rim. You’ll typically hear a pop or see the tire edge settle into the rim’s groove.
- Monitor the inflation process closely. Avoid over-inflation, as this can be dangerous. Always refer to the tire’s sidewall for the maximum recommended inflation pressure.
Tips and Reminders:
- Use Ample Lubrication: Don’t skimp on the soapy water or lubricant. It’s your best ally in making this process easier.
- Stay Patient: Like removing a tire, mounting one without a machine demands patience. Take breaks if needed.
- Check Seating: After inflation, inspect the tire’s seating. Ensure it’s uniform all around the rim. Any irregularities might indicate the need to deflate and readjust before re-inflating.
Resources
Below are some links you may find helpful when learning about tires
Final Thoughts
Through proper knowledge and tools, you can identify and address tire imbalances at home. Remember, an unbalanced tire can manifest as vibrations, unusual noises, and uneven tread wear. While there are DIY methods available, especially for those without specialized equipment, it’s essential to approach the process with caution. Prioritize safety, equip yourself with the necessary gear, and regularly inspect your tires to preempt potential issues.
Good luck and happy motoring.