You know the significance of a perfectly aligned set of wheels for a smoother, safer ride and long-lasting tires. But how do you transition from understanding its importance to actually mastering the procedure yourself? It’s time to demystify the step-by-step process of wheel alignment.
Wheel Alignment Procedure
A wheel alignment procedure involves a systematic process to set your vehicle’s wheels to optimal angles. The primary steps include:
- Pre-alignment inspection to check for damaged parts.
- Adjusting the camber angle to ensure the wheel is perpendicular to the road.
- Fine-tuning the caster angle for stability and steering ease.
- Setting the toe angles to make sure wheels point straight ahead.
- Checking front-end and rear axle alignments.
- Final test drive to confirm smooth driving and proper alignment.
In this article, you’ll dive deep into the intricacies of wheel alignment, discover its importance, learn about the signs indicating misalignment, and get valuable insights on steering wheel issues, tire wear, and more.
Let’s take a closer look.
The Step-by-Step Wheel Alignment Procedure
Performing a wheel alignment is a meticulous process that ensures your vehicle’s wheels are set to the optimal angles. This step-by-step procedure covers the standard approach for both passenger cars and trucks.
Preparation
Before diving into the actual alignment, proper preparation is critical.
Researching Manufacturer’s Specifications
Before making any adjustments, consult the manufacturer’s manual or official resources to ascertain the correct alignment specifications for the specific car or truck model. This will serve as your primary guide throughout the alignment procedure.
Positioning the Vehicle
- Place the vehicle on a level surface. This ensures that the alignment readings are accurate.
- Make sure the steering wheel is in a straight position. It should neither be turned to the left nor the right.
Check Tire Pressure
- Tire pressure can affect alignment readings. Ensure all tires are inflated to the manufacturer’s recommended level.

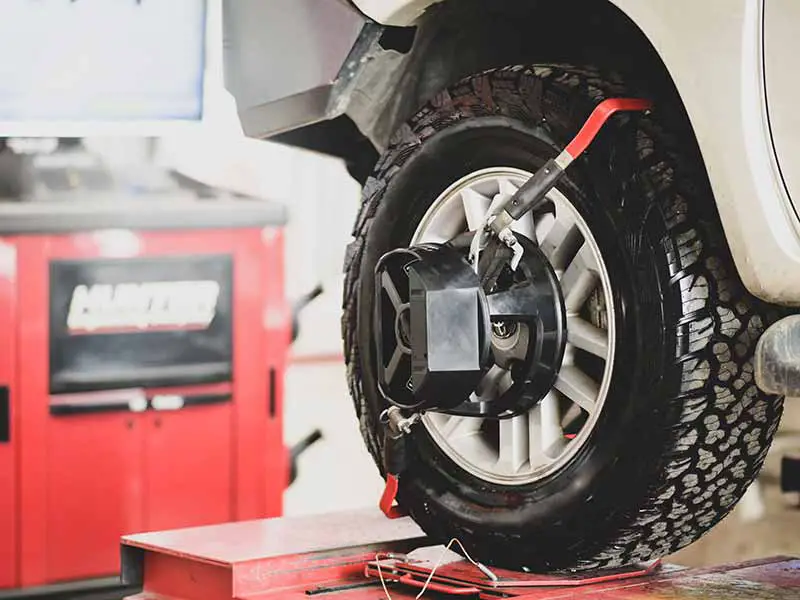
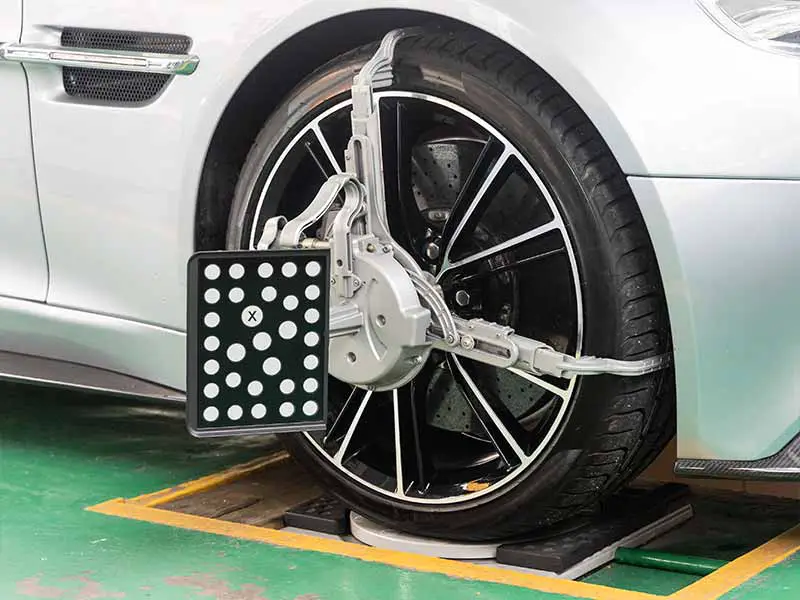
Using the Alignment Machine
Modern wheel alignments are performed using specialized machines that provide precise measurements.
Setup
- Mount the vehicle on the alignment rack.
- Attach sensors to all four wheels. These sensors communicate with the alignment machine to determine the current alignment of each wheel.
Measurement
- The alignment machine takes initial measurements, comparing them against the manufacturer’s recommended settings.
- Note down the current angles for camber, caster, and toe.
Manual Wheel Alignment
While not as precise as modern machinery, manual methods can still provide satisfactory results for wheel alignment when done with care and attention to detail.
Setup
- Measure and adjust tire pressure to ensure consistency.
- Mark the center of each tire’s tread with chalk or masking tape for reference points.
Measurement
- String Line Method for Toe: Stretch a string between two jack stands on both sides of the car, ensuring the string touches the front and rear portions of the tire at the center marks. Measure the distance between the string and the front and rear center marks of the tire. The difference indicates the toe setting.
- Inclinometer or Camber Gauge for Camber: Attach the gauge to the wheel’s center hub or spindle. Adjust the wheel to where the bubble gauge is centered, and note the measurement, which indicates the camber angle.
- Turn Plates for Caster: With the vehicle on turn plates, turn the wheels 20 degrees outward and measure the camber. Then, turn the wheels 20 degrees inward and measure again. The difference between the two readings provides the caster angle.
While this method requires patience and can be time-consuming, it offers a hands-on approach to understanding wheel alignment and making adjustments. However, for the most accurate results, it’s advisable to have the alignment verified with a machine afterward or by professionals.
Adjusting The 3 Main Alignment Angles
Ensuring that each wheel is set to the manufacturer’s specifications means that your tires wear evenly, your car handles optimally, and you get the most out of your fuel efficiency. However, wheel alignment is not just about setting wheels straight; it involves a series of intricate adjustments to various angles of the wheels. In the following sections, we’ll delve into the specific procedures for correcting these alignment angles, providing a comprehensive guide on the steps and considerations involved.


Adjusting Camber Angle
The camber angle is crucial for tire wear and vehicle handling.
1. Locate Adjustment Bolts
- On most vehicles, the camber is adjusted at the suspension strut tower.
- Locate the bolts and loosen them slightly.
2. Make Adjustments
- Use the alignment machine readings as a guide.
- Turn the bolt to either increase or decrease the camber angle, depending on the requirement.
3. Tighten and Verify
- Once the desired camber angle is achieved, tighten the adjustment bolts.
- Recheck with the alignment machine to confirm accuracy.


Adjusting Caster Angle
The caster angle affects the vehicle’s stability and steering feel.
1. Accessing the Caster
- On many vehicles, the caster is adjusted at the lower ball joint.
- Loosen the necessary components to access the adjustment point.
2. Adjust and Confirm
- Adjust the caster angle based on the machine’s readings.
- Recheck to ensure accuracy and tighten all components once the adjustment is completed.


Adjusting Toe Angles
Toe angles impact tire wear and how the vehicle tracks on straight roads.
1. Loosen Tie Rods
- Locate the tie rods, which connect the steering system to the wheels.
- Loosen the lock nuts on the tie rods.
2. Adjust Toe Setting
- Rotate the tie rod itself to adjust the toe angle.
- The alignment machine will provide real-time readings. Adjust until you achieve the desired setting.
3. Secure and Verify
- Once the toe is set correctly, tighten the lock nuts.
- Recheck the alignment readings on the machine to confirm accuracy.
Final Checks
After all adjustments, a thorough check is vital to ensure everything is in order.
1. Review Alignment Readings
- The alignment machine should show that all angles are within the manufacturer’s specifications.
- Any discrepancies should be addressed immediately.
2. Test Drive
- After the alignment, take the vehicle for a short drive.
- Ensure the steering wheel remains straight when driving and that there are no unusual vibrations or pulling to one side.

Front End Alignment vs. 4 Wheel Alignment
When it comes to wheel alignment, there are two primary types that vehicle owners should be aware of: front end alignment and four-wheel alignment. Both serve the essential purpose of aligning your vehicle’s wheels, but they target different sets of wheels and are suitable for varying vehicle configurations.
Front End Alignment
A front end alignment, often called a “two-wheel alignment,” specifically targets the front wheels of your vehicle.
What It Involves:
- Adjusting the angles of only the front two wheels.
- Primarily focuses on the camber, caster, and toe settings of these wheels.
When to Opt for Front End Alignment:
- If your vehicle has a solid rear axle, where the rear wheels don’t have adjustable angles.
- When the primary issues or symptoms (like the vehicle pulling to one side) are only associated with the front wheels.
Benefits:
- Typically quicker and less expensive than a four-wheel alignment.
- Can significantly improve steering response and reduce uneven tire wear at the front.
Four-Wheel Alignment
A four-wheel alignment, as the name suggests, involves checking all four wheels of your vehicle.
What It Involves:
- Adjusting the angles of both front and rear wheels.
- Ensuring that all wheels are parallel to each other and perpendicular to the ground.
When to Opt for Four-Wheel Alignment:
- If your vehicle has independent rear suspension, which allows for adjustments of the rear wheel angles.
- When there are alignment issues or symptoms linked to both front and rear wheels.
- After significant suspension or steering component replacements, or after an accident.
Benefits:
- Ensures the optimal performance of all four wheels.
- Enhances overall stability, handling, and tire lifespan.
- Reduces uneven tire wear on both front and rear tires.
Understanding and Adjusting Rear Axle Angles
The rear axle angles play a pivotal role in your vehicle’s handling, stability, and overall tire wear. Whether your vehicle has a solid rear axle or independent rear suspension, understanding and making necessary adjustments is crucial for optimal performance.
Rear Axle Angles Explained
Solid Rear Axle vs. Independent Rear Suspension
- Solid Rear Axle: This is a single piece of metal that connects both rear wheels. With this design, when one wheel moves, the other one does too.
- Pros: Durability, especially in trucks and off-road vehicles.
- Cons: Limited adjustment capabilities, can result in a less comfortable ride on uneven surfaces.
- Independent Rear Suspension (IRS): In this setup, each wheel operates independently.
- Pros: Better ride comfort, and each wheel can be adjusted for alignment.
- Cons: Generally more complex and might require more frequent checks and adjustments.
Key Rear Axle Angles
Just like the front wheels, rear wheels have their own alignment angles:
- Camber: Refers to the inward or outward tilt of the tire when viewed from the back. As with the front camber, negative camber means the top of the tire is tilted in, while positive camber means it’s tilted out.
- Toe: Rear wheels can also be toed-in or toed-out. The principles are the same as for the front wheels.
How to Adjust Rear Axle Angles
Adjustments for the rear axle angles vary based on whether you’re dealing with a solid rear axle or IRS.
Solid Rear Axle Adjustments
- Adjustments are limited due to the fixed nature of the axle.
- If there’s misalignment, it’s often a sign of wear or damage and might require replacement of parts or the entire axle.
Independent Rear Suspension Adjustments
- Adjusting Camber:
- Locate the camber adjustment bolts near the wheel hub.
- Loosen the bolts slightly, and adjust to either increase or decrease the camber angle.
- Re-tighten the bolts and verify the new angle using an alignment machine.
- Adjusting Toe:
- Find the tie rods or adjustment screws related to rear toe.
- Loosen the necessary components.
- Adjust the toe by turning the adjustment mechanism, monitoring the changes using an alignment machine.
- Once the desired toe angle is achieved, tighten all components.
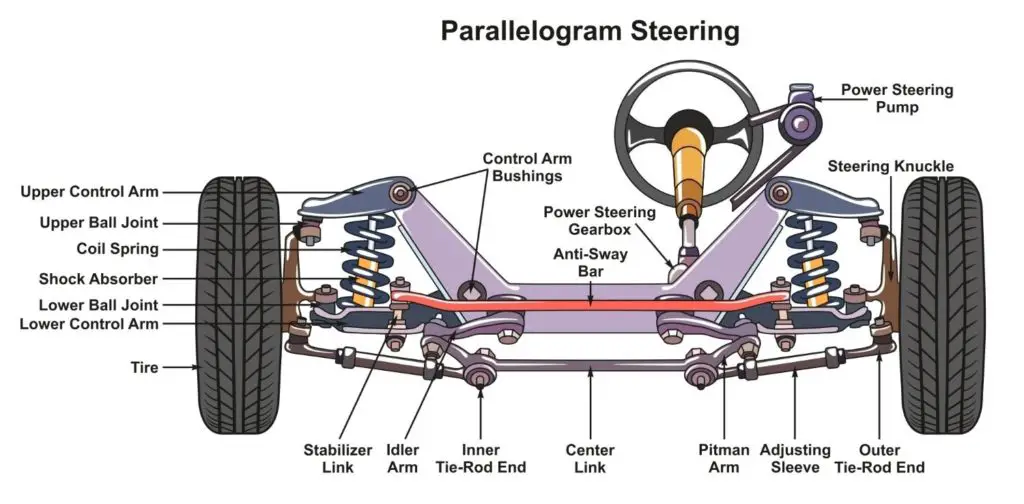
Steering Wheel Issues and Their Indications
The steering wheel is not only your primary point of interaction with your vehicle but also an indicator of potential alignment or other mechanical issues. Recognizing these signals can aid in diagnosing problems early, potentially saving time, money, and ensuring a safer driving experience.
Common Steering Wheel Issues
Crooked Steering Wheel
When driving straight, your steering wheel should be almost perfectly horizontal. If it’s off-center:
- Possible Causes:
- Recent tire replacement or rotation not done correctly.
- Suspension damage, especially if the vehicle recently hit a pothole or had an accident.
- Wheel alignment issues.
Steering Wheel Vibration
A shaky or vibrating steering wheel can be both uncomfortable and alarming.
- Possible Causes:
- Unbalanced tires: When the weight of the tires isn’t distributed evenly around the wheel.
- Bent wheel or damaged tire.
- Worn out or damaged suspension parts.
- Alignment issues, especially related to front wheels.
Hard Steering
If the steering wheel feels stiff or harder to turn than usual:
- Possible Causes:
- Low power steering fluid.
- Power steering pump malfunction.
- Faulty steering rack or gearbox.
- Damaged or worn out belts.
Using Steering Wheel Indications for Diagnosis
- Listen and Feel: Pay close attention to any noises when turning the wheel. Grinding, squeaking, or popping sounds can indicate various issues from low fluid to damaged components.
- Visually Inspect: Sometimes, the problem might be evident upon a simple visual check. Look for uneven tire wear, damaged tires, or components that seem out of place.
- Check Alignment Regularly: If the steering wheel starts showing any of the mentioned symptoms, it’s a good idea to check wheel alignment. Misalignment can not only cause steering wheel issues but can also lead to other long-term problems.
Additional Information to Keep in Mind
Understanding the nuances of wheel alignment goes beyond just knowing how to adjust angles. By recognizing the signs of alignment problems and their impact on various vehicle components, you can ensure longevity and optimal performance.
Understanding Excessive Tire Wear
Tires naturally wear down over time. However, how and where they wear can tell a lot about your vehicle’s alignment.
Distinguishing between Normal and Excessive Tire Wear:
- Normal Wear: Typically, even wear across the tire’s tread, occurring over an extended period of driving.
- Excessive or Uneven Wear: Signs include bald spots, feathering (tread is smooth on one side and sharp on another), or wearing more on the inside or outside edge.
How Improper Alignment Reduces Tire Life:
- Camber Misalignment: Causes wear on one edge of the tire, either inside or outside.
- Toe Misalignment: Leads to feathering and rapid tread wear.
- Incorrect Caster: Can cause difficulties in steering but doesn’t typically cause tire wear. However, its misalignment can signify other problems leading to wear.
The Link between Wheel Alignment and Fuel Efficiency
Proper alignment does more than just prolong the life of your tires; it’s also a factor in your vehicle’s fuel efficiency.
How Alignment Improves Fuel Efficiency:
- Reduced Rolling Resistance: Misaligned tires can create more friction with the road, making your engine work harder.
- Wheels Moving in the Same Direction: When wheels are aligned and move harmoniously in the same direction, it reduces the effort and energy required to propel the car forward, conserving fuel.
Wheel Alignment Cost
Investing in regular wheel alignments can appear as an added expense, but when considering the long-term savings, it’s well worth it.
Average Costs of Wheel Alignments:
- Two-wheel Alignment: Typically ranges from $50 to $70.
- Four-wheel Alignment: Generally between $100 to $150, depending on the vehicle and service provider.
Why Regular Alignments Save Money:
- Tire Replacement Savings: Ensuring proper alignment reduces uneven tire wear, extending tire life, and delaying the need for costly replacements.
- Fuel Efficiency: Properly aligned wheels can enhance fuel efficiency, resulting in savings at the pump.
Importance of Tire Balancing
While wheel alignment and tire balancing both concern tires, they address different issues.
Difference between Wheel Alignment and Tire Balancing:
- Wheel Alignment: Focuses on adjusting the angles of tires so they’re perpendicular to the ground and parallel to each other.
- Tire Balancing: Concerns the distribution of weight around a wheel-tire assembly. It ensures that the tire rotates evenly.
Effects of Imbalance:
- Steering Wheel Vibration: One of the first signs of imbalance. Typically felt at specific speeds.
- Uneven Tire Wear: Imbalance causes parts of the tire to bear more load, resulting in irregular wear patterns.
- Additional Stress on Suspension: Imbalanced tires can strain the suspension, leading to premature wear of components.
Resources
Below are some links you may find helpful when learning about tires
- Back2Basics: Step-by-step vehicle alignment – Tire Review Magazine
- Tire alignment: What you need to know – Firestone
Final Thoughts
Through understanding its various aspects, from recognizing signs of misalignment to mastering the step-by-step alignment process, one gains a holistic appreciation of its importance.
Key takeaways include the significance of the camber, caster, and toe angles, the differences between front-end and four-wheel alignments, and the overarching benefits: enhanced fuel efficiency, extended tire life, and a safer, more stable drive.
Good luck and happy motoring.